
Once you get your new or used kayak back home, the first thing you want to do is start modifying it! This often means you want to start attaching new gear to your kayak, right?
Drilling holes in a kayak is the best way to attach accessories and gear tracks. Use the proper size drill bit matched to the screw to drill a proper-sized hole for a tight fit. Waterproof silicone will help keep holes from leaking. If the hole is too small, cracks can develop, and water may enter.
When you get your very first kayak, there are always a lot of questions to ask. One of the first questions on someone’s mind is, “Can I drill holes into my kayak???” Because you want to personalize your kayak to your needs and add rod holders, eyelets, storage crates, and other gear to it!
Well, yes, you can drill into your kayak! Read on!
If you’re interested in adding accessories to your kayak, check out the best gear tracks on Amazon for your kayak!
The Best Way to Attach Accessories on a Kayak
Did You Know: You can see a variety of gear track options and accessories which mount directly to the track without drilling on Amazon by clicking here!
Many manufacturers are coming out with different gear tracks and accessories. There are many ways to attach them. Some kayak companies even have proprietary fastening systems for their specific gear track and accessories.
Most of these gear tracks come with their own fastening devices and accessories that readily fit into the gear track.
But what if you want to install some of your own DIY accessories or have a rod holder with screw-mounted bases? You must drill your holes and decide on the fastening system that works best for your application!
Always Use Stainless Steel Fasteners When Possible
Whenever I attach or mount anything to something that will be near the water, I prefer to use stainless steel hardware if possible. Stainless steel is resistant to rust and corrosion, and you’ll be happy you did if you ever need to remove a rusted fastener from your kayak!
Here are the three most common ways of attaching your gear tracks and accessories to your kayak.
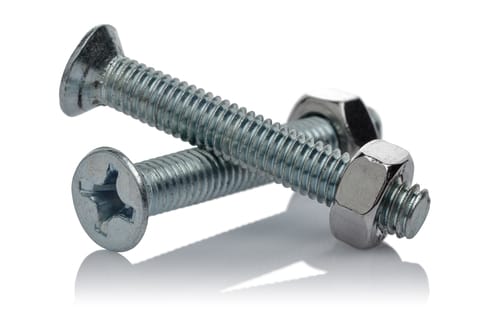
Bolts
Bolts are the best method overall for securing add-ons to your kayak. With a washer and nut on the backside, they are the most secure of the three ways to install your attachments.
During the bolting process, you will need access to the underside of your mounting area. This can often be reached through a dry-bag hole or a nearby hatch or storage compartment.
If you have the room, a backing plate is advised, as this attachment will receive a lot of force or leverage, like a rod holder.
Screws
Screws are the second most commonly used way to attach gear and hardware to your kayak. Since there is no backing plate, screws can be susceptible to being pulled out.
If you’re not careful when installing your screws in the kayak’s plastic decking, the hole can be prone to stripping. This is when you tighten the screw too tight, and it cuts – or strips – the hole.
When a hole is stripped, it no longer has its holding power. You’ll need to get a slightly larger screw to fill the newly sized hole!
Pop Rivets
The last option for me would be pop rivets. Pop rivets are generally used when there is no access to the backside of where you want to install or attach your accessories.
Pop rivets are installed with a pop rivet gun and tend to loosen over time. In a metal-to-metal application, I’ve had a good experience with them—just not with plastics, which may take a beating.
When using pop rivets for plastic, the rivet seems to work loose where it expands against the hole. If you’ve never used a pop rivet before, check out this 35-second video.
As you can see from the video, when the rivet’s flange is pulled up against the kayak’s plastic, there is very little to hold. The rivets can come loose as the kayak flexes, and the plastic expands and shrinks due to temperature changes.
What Screws to Use on a Kayak
You can use different types of screws depending upon your access to the backside of where you desire to place your mount, where you’ll be mounting your gear, and how much or little force will be placed upon the attachments.
Stainless Steel Screws
If you have access to the mounting area’s backside, you will want to use stainless steel screws with a locking nut and washer. Obviously, we always want to use stainless steel fasteners whenever we can!
Further down, you’ll learn how to match your drill bit to the screw so your hole size is perfect!
Self-Tapping Screws
Not my favorite method of attaching accessories by any means! They tend to loosen rather quickly in their holes and cause your gear to wobble and even possibly fall off!
Self-tapping screws will drill or cut their own holes when they are screwed into the plastic hull or deck.
Two types of self-tapping screws are available at your local hardware or box discount stores – thread forming and thread cutting.
Self-Tapping Thread Forming Screws
Thread-forming screws were designed for use in plastics and will deform the material as you turn the screw into the kayak.
Thread-forming screws will remain in the plastic more tightly since it cuts its own hole, but if you over-tighten the screw, it can cause the plastic rail or decking to deform. This will cause the screw to loosen in the hole.
Self Tapping Thread Cutting Screws
Thread-cutting screws are used more for wood and metal, not plastics, and they actually remove material from the hole creating their own pathway.
One of the major drawbacks of thread-cutting screws is that they tend to strip out their holes when removing the fastener. If this happens, use a slightly larger screw, if possible, to replace your accessory.
Save Those Plastic Thread Shavings
One of the best tips I ever received from an old kayak fisherman was to save all your plastic shavings when you drill into your kayak!
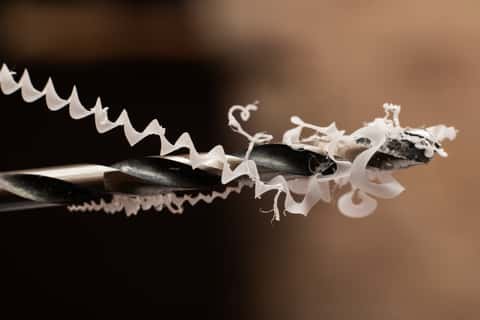
Every time you drill into your kayak to install GPS, fish finders, boom or flag mounts, etc., save all those shavings! They could come in handy sometime down the line!
If you ever decide to move an attachment or change your anchor trolley, you may want to remove some old mounting plates.
The shavings you save from the kayak is obviously made from the same material and color. Use these shavings for future unnoticeable repair work!
Drilling Holes in a Kayak
Some people say they’d never drill a hole into their kayak. Eventually, they will want to add GPS/Fish Finder Units, Anchor Trolleys, and additional rod holders, among other possible items.
And if you take a look at your kayak, chances are there are already many holes in it! Most kayaks have bungee cords and, at other times, pre-installed. Some kayaks have dozens of screws and bolts already holding accessories!
A good rule of thumb is never to drill below the waterline of your kayak unless you have an excellent reason to do so and know what you’re doing.
Let’s look at the steps to drilling into your kayak…
Decide Where to Place Holes in the Kayak
There is nothing worse than drilling and attaching accessories only to get out to the water and find out they are positioned wrong for you.
Pro Tip: If you’re going to drill and mount your gear without testing the placement on the water, keep your paddle stroke in mind.
Take your kayak out for a paddle, bring along some fishing gear if you like, paddle, and cast around. Where does it “feel normal” to place your gear? Where does it “feel natural” to move your hands and body when you reach for something?
You will want to attach rod holders, tethers, and other assorted gear in these spots.
Make a cardboard template of the baseplate, or bring the accessory out with you and a waterproof magic marker to mark the placement location.
When you find the spot that “feels right” to you, use the magic marker to trace the template onto the kayak or mark the baseplate holes where you would like to place the accessory.
Now you know where you actually want and need to drill your holes!
Mark the Holes
Using a small diameter punch, a supplied screw, or even a nail, mark the first hole with a little bit of a scratch or dent in the plastic.
This will keep the drill bit from “walking” around when you start your hole.
Drill the First Hole
Once your screw hole position is marked, use the proper-sized drill bit for the job. Normally, in the provided instructions, a bit size will be indicated.
If not, hold your screw up behind a drill bit you think is the correct size, and you should only see some of the threads and not the screw shank protruding from behind the drill bit.
Go ahead now and drill the first hole.
Set the Accessory
Once you have your first hole drilled, set your accessory in place on your kayak, and start or secure the first screw into the hole.
With the first screw secured, the accessory will be in perfect position!
Mark the Rest of the Holes
With the accessory in place where you want it, mark the remainder of the holes with the punch, screw tips, or a small nail.
Drill the Remaining Holes
Now that you have placed the remaining marks, you can drill out the rest of the holes.
Remember to save those drill shavings! If your kayak is new, you may find quite a bit of shaving inside. Many times, kayaks are prepped and shipped without cleaning them out!
Sealing Screw Holes in the Kayak
The best way to seal screw holes is to dab a bit of waterproof sealant onto the threads. As the screw turns into the hole, the sealant will take up space near the threads and plastic, sealing the water out. Also, place a small amount of waterproof sealant beneath the screw head itself.
It’s also a good practice to smear a bit of sealant around the accessory baseplate to help seal out water further.
I find a silicone bathroom sealer works well for my applications.
So you see, drilling holes into your kayak to mount accessories isn’t difficult once you get past the initial uncertainty.
Related Articles
Interested in adding rod holders or safety flags to your kayak? Check these articles out!
- How to Outfit a Kayak for Fishing: The Ultimate Guide
- Can You Add Rod Holders to Your Kayak?
- Do I Need a Flag on my Kayak?
- Can You Fish From a Regular Kayak?
Have fun, and stay safe out there!