
The feeling of freedom you get when casting your line from a kayak is a special thing, and more and more people are coming to appreciate fishing from these small vessels.
Several factors can make this practice a bit difficult, but thankfully, there are tools designed specifically for kayak fishing that address these issues. A kayak anchor trolley is just such a tool, but how does it work?
A kayak anchor trolley works by attaching a rope and pulley system to anchor cleats on your kayak that allows for movement of the anchor line from the bow to the stern of the boat and any point in between. With a quick adjustment, the anchor line can be positioned for any situation on the water.
This article will look at how these handy tools function and why they are essential for successful kayak fishing. We will also look at whether you can install an anchor trolley on your own kayak. Whether you are a seasoned veteran looking to up your game or you are new to the kayak fishing, if you have ever wondered how anchor trolleys worked, read on.
What Is an Anchor Trolley?
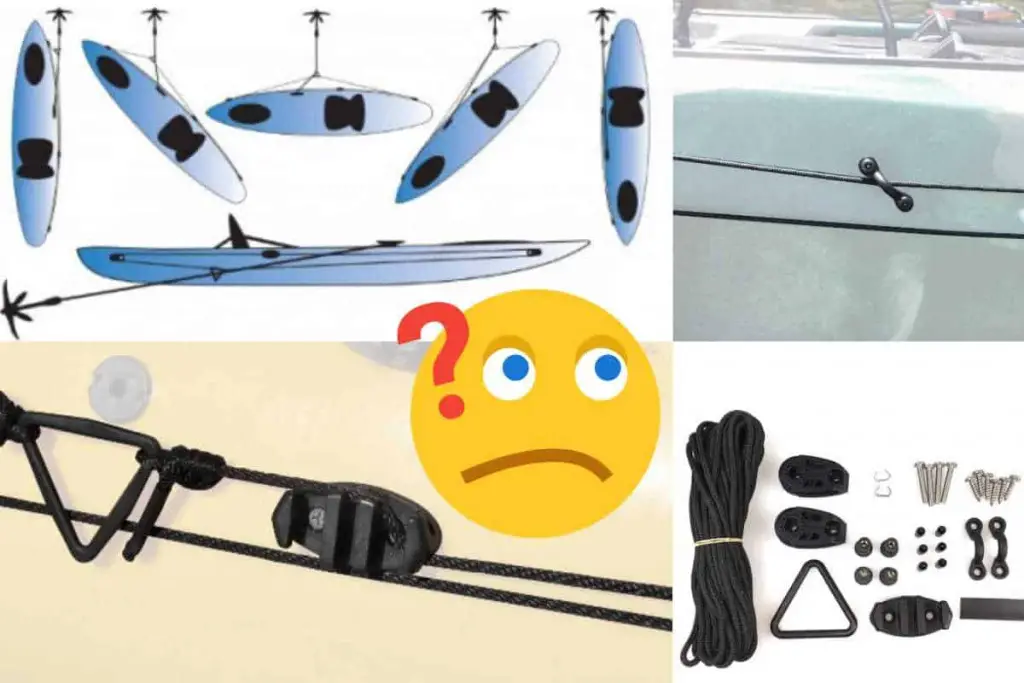
An anchor trolley is a pulley system attached to the side of your kayak, either taking advantage of existing anchor pad eyes or drilling and attaching pad eyes specifically to allow for the trolley installation.
While there is a wide variety of anchor trolleys on the market, they are all made up of several key components essential for the system to function properly.
- Fore and Aft Pad Eyes
- Fore and Aft Pulleys
- Guide Pad Eyes
- Zigzag Cleat
- Rope
- Anchor Loop
- Anchor Pad Eye
Anchor Trolley Layout
To understand how an anchor trolley on a kayak works, let’s look at how each of the components is arranged on the kayak’s hull.
Fore and Aft Pad Eyes and Pulleys
The fore and aft pad eyes are placed about 12 inches (30.5 cm) from the bow and stern of the kayak, respectively, and the eye of each pad eye should be oriented parallel to the hull of the kayak. The pad eyes should also be placed as high up on the hull as possible where the gunwale meets the side of the kayak.
Depending on which trolley system you have purchased, the fore and aft pulleys will either be incorporated into the cleats themselves like the YakAttack Stealth Pulley or separate units like the YYST Kayak Anchor Trolley System that are attached using carabiners. In either case, the units should be attached in the same location and on the same orientation.
Guide Pad Eyes
The next components in your anchor trolley are the guide pad eyes. As the name implies, these pad eyes are used to guide the rope and keep it from jumping up over the gunwale and into the kayak’s cockpit.
The fore guide should be placed about ⅓ back from the kayak’s bow and oriented at a roughly 45° angle with the highest point of the cleat facing the bow. This positioning will allow for a smooth and unobstructed shuttling of the anchor line.
The aft guide should be placed about ⅓ forward of the kayak stern at a 45° angle with the highest point of the cleat facing the back of the kayak. Once again, this guide’s orientation will allow the pulleys to move freely while keeping the rope in the correct position and out of the kayaker’s way.
Zigzag Cleat
This brings us to another essential component in your anchor pulley system: the zigzag cleat. The Zigzag Canoe Cleat by H2o is a good example.
A zigzag cleat is a plastic piece with a series of raised ribs that allow you to lace the rope in and hold it in place without tying knots. This is an important part of the anchor trolley because it lets you lock the anchor in place at any point along the length of the kayak. This allows you to optimize the anchor placement depending on wind, tides, current and casting direction.
The zigzag cleat will be located on the same side of the kayak as the other hardware and should be within easy reach of the kayaker when seated in the cockpit. It should be placed so that the ribs are perpendicular to the kayak’s length and placed as high as possible, just below where the gunwale meets the sidewall.
Rope and Anchor Loop
The rope is the bit of equipment that moves your anchor line up and down the length of the kayak and is threaded through the pulleys at the bow and stern.
The rope is threaded through the pulleys and guide pad eyes and is attached to the anchor loop on one end with a knot and the other using fasteners. One end must be tied to make adjustments or replacements if necessary.
To ensure you have the proper length of anchor line rope for your kayak, look at my other article: How Long Should a Kayak Anchor Line Be.
Anchor Pad Eye
This is the pad eye to which you attach the anchor line, and it allows us to point out a common mistake that people make when using their kayak anchor trolley. The Docooler Bungee Tie Downs are an example of available pad eyes.
The anchor loop guides your anchor line from the bow to the stern, but you should never attach your anchor line directly to the loop. Instead, attach your anchor line to the anchor pad eye and thread it through the loop. This will still allow you to position the anchor line anywhere along the length of the kayak while keeping access to the anchor line’s tie-down within arm’s reach.
This is important because if you attach the anchor line directly to the loop and need to cut the anchor quickly, you may be out of luck. Whether it is due to currents threatening to flip your kayak or a fish that has wrapped itself around your anchor line, having this tie-down within reach is a good idea.
Why Do You Need a Kayak Anchor Trolley?
For a kayak angler, finding the right position to cast is essential for an enjoyable and successful fishing trip. You can optimize your anchor position with an anchor trolley for any currents, wind, or tide conditions.
For example, if you have a tailwind, you may want to orient your kayak so your bow faces downwind to get the most distance with your cast. With an anchor trolley, you can set the anchor to the boat’s stern so that the wind pushes your bow forward.
Alternatively, if you are in calm water with little current, you can position the anchor line midway down the kayak’s length and hang your feet over the opposite side for another casting angle.
Without an anchor trolley, you would need multiple cleats or pad eyes down the length of your kayak and would constantly be tying and tying lines as the winds and currents changed.
DIY or Professional Installation?
For anyone with the slightest experience with power tools, installing an anchor trolley on their kayak shouldn’t be any trouble as this installation video from YakGear demonstrates.
There are various companies that produce these maritime tools that are all fairly simple to attach to your kayak. The YakAttack Kayak LeverLoc anchor trolley is an example that is designed specifically for use on a kayak.
With a cordless drill, a rivet gun, and the hardware provided, you can take full advantage of an anchor trolley in a little over an hour.
Final Thoughts
An anchor trolley is a great tool to have for any kayak owner. While they are specifically designed for fishing, they are just as useful for a recreational kayaker who wants to get the most out of their time on the water.
Related Articles:
- How to Outfit a Kayak for Fishing: The Ultimate Guide
- Kayak Fishing Anchors – Do You Really Need One?
- How Long Should a Kayak Anchor Line Be
Whether you are a dedicated angler or a hobbyist looking for a safe and relaxing afternoon on the water, an anchor trolley should be a part of every kayak owner’s kit.
Have fun, and stay safe out there!